
Compteurs d'énergie Inepro

Appareils pris en charge
| Device Type | Modbus TCP (Ethernet) | RS485 |
|---|---|---|
| Inepro PRO380 | ❌ | ✅ |
Câblage
RS485
Info
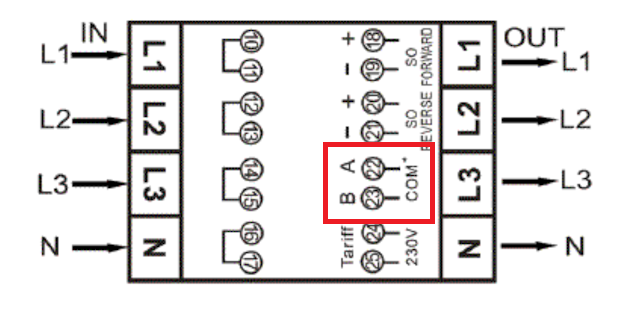
RS485 Wiring
- For correct RS485 wiring: Follow the guidelines for RS485 wiring.
- If the wiring shown in the table below is incorrect, please let us know.
- There is no general consensus in the industry about the usage of A and B for the RS485 polarity, so it may be counterintuitive and opposite of what you might expect for some devices.
| Device | SmartgridOne Controller model OM1 | SmartgridOne Controller model IG8 | RS485-USB converter | RS485-Ethernet converter |
|---|---|---|---|---|
| A (pin 22) | RS485 A | RS485_POS | RS485 A | TX+ |
| B (pin 23) | RS485 B | RS485_NEG | RS485 B | TX- |
| N/A | RS GND | GND | Not available | G |
Configuration
Avertissement
NOTE: RS485 Device Addresses
- You MUST give each device on the RS485 bus a unique address. Check the manual of the device on how to do this.
- Use lower addresses first (1, 2, ...) because the SmartgridOne Controller will find them faster!
- For each device, it is generally recommended to stick with the factory default baud rate, parity, and stop bits. The SmartgridOne Controller will scan on those first.
Consultez le manuel du compteur pour obtenir des informations plus détaillées sur la modification de l'adresse Modbus. Par défaut, le compteur est configuré sur l'adresse 1. Celle-ci peut être modifiée via l'écran du compteur.
- Utilisez les boutons pour accéder au Mode Programme 2.
- Maintenez le bouton droit enfoncé pendant 3 secondes pour ouvrir le menu.
- Faites défiler jusqu'à la page LCD Modbus/M-bus ID (addr xxx).
- Maintenez le bouton droit enfoncé pendant 5 secondes pour accéder au mode de programmation.
- La valeur commence à clignoter : sélectionnez 3 chiffres (Modbus : 001-247). Confirmez chaque chiffre en maintenant les deux boutons enfoncés pendant 3 secondes.
- L'écran LCD affiche OK lorsque le réglage est confirmé.

Last updated December 10, 2025Edit this page