Self-configured energy meter (*special support terms apply)
When your energy meter has configurable modbus addresses (or when your energy meter is not in the list of supported devices) , we supply a feature to configure an energy meter yourself. It's a process that allows you to set up the energy meter as a modbus slave, enabling it to communicate with the SmartgridOne Controller.
Attenzione
WARNING: Special support terms apply: *Please note that this feature is provided “as-is” and should be used at your own risk. If you run into any issues or need dedicated assistance, we’re happy to help under a support contract. Contact sales@smartgridone.com for pricing and availability.
Step 1
Connect the meter to the SmartgridOne Controller using RS485 or Modbus TCP.
- For Modbus-TCP ethernet: Please follow the guidelines for ethernet wiring. For correct ethernet wiring:
- For RS485: Please follow the guidelines for RS485 wiring
Also, check your meter's manual for the correct wiring and connection details and check if any settings need to be changed to enable the modbus communication.
Step 2
Collect the following information from your energy meter:
- Modbus address: The address of the energy meter on the RS485 bus.
- Baud rate: The communication speed of the energy meter (e.g., 9600, 19200, etc.).
- Parity: The parity setting of the energy meter (e.g., None, Even, Odd).
- Register information: For each measurement you want to read, you'll need:
- Register address (in decimal)
- Data type (e.g., int16, uint32, float32)
- Word order (if applicable for multi-register values)
- Any scaling factor or offset needed
- The type of measurement (e.g., voltage, current, power)
Step 3
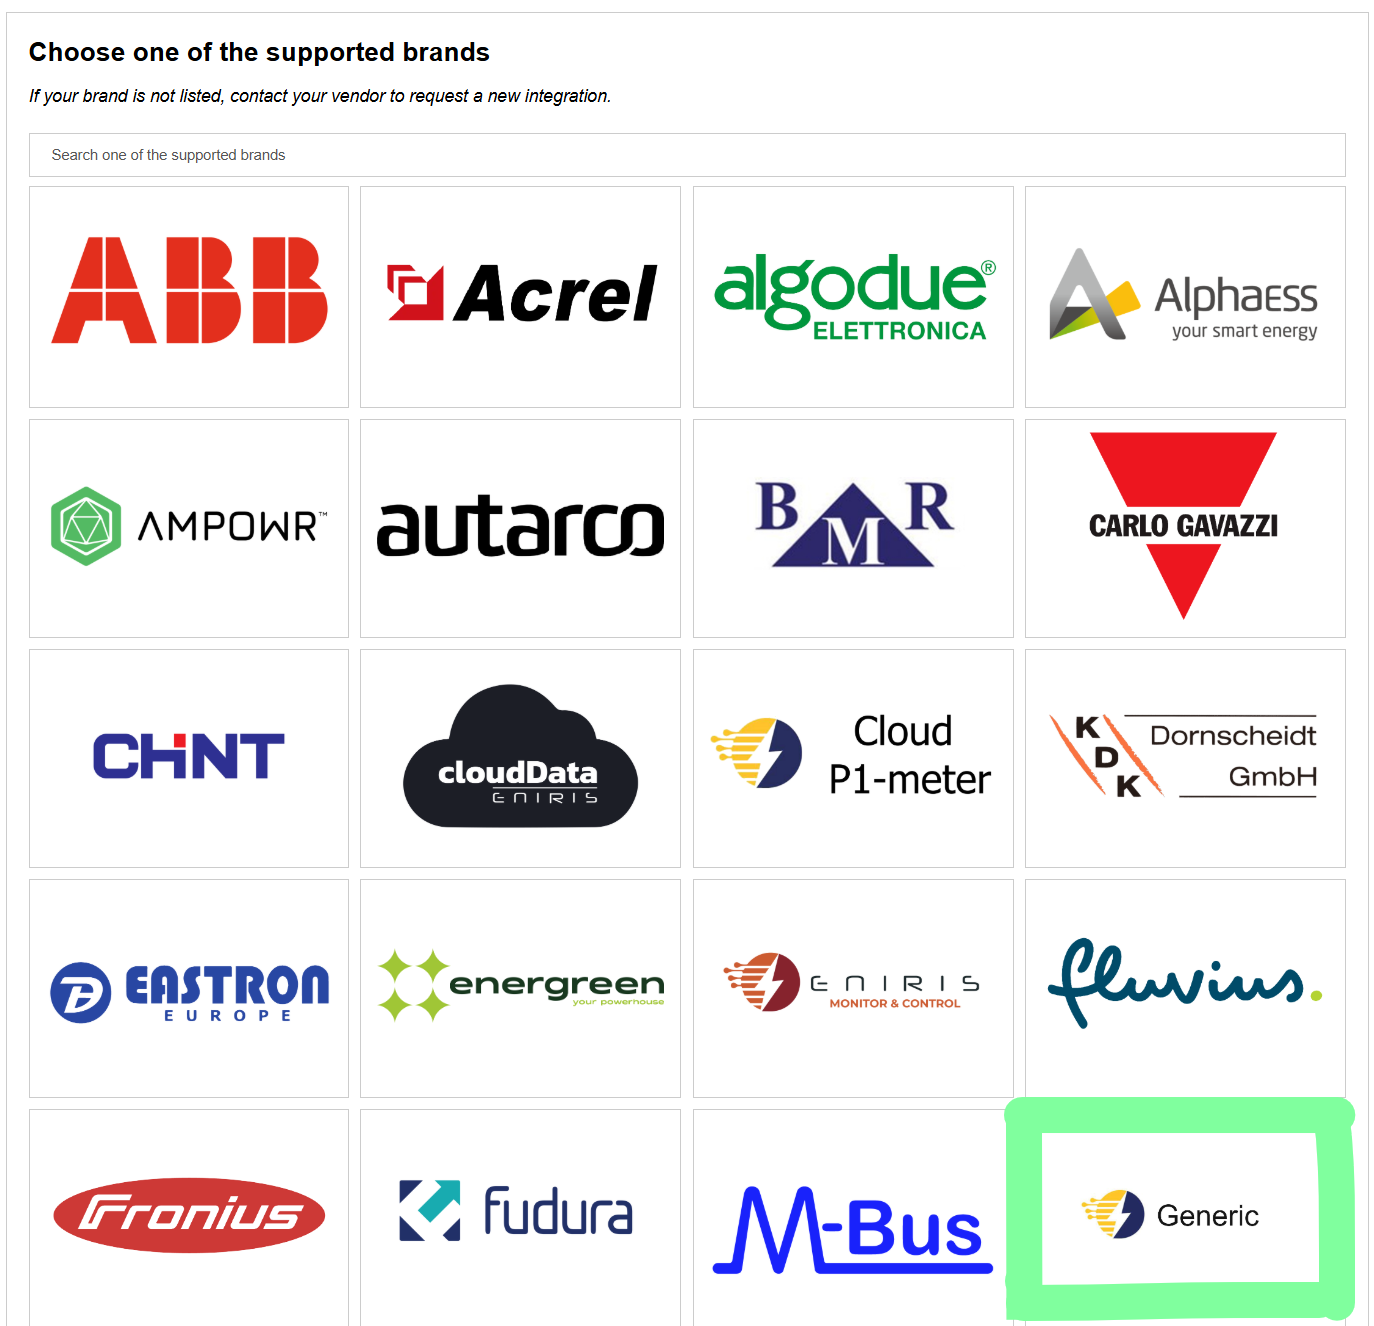
Open the SmartgridOne Controller web interface and navigate to the energy meter configuration section. Then, find the "Generic" driver:
Select the interface you'd like to use (RS485 or Modbus TCP).
Step 4:
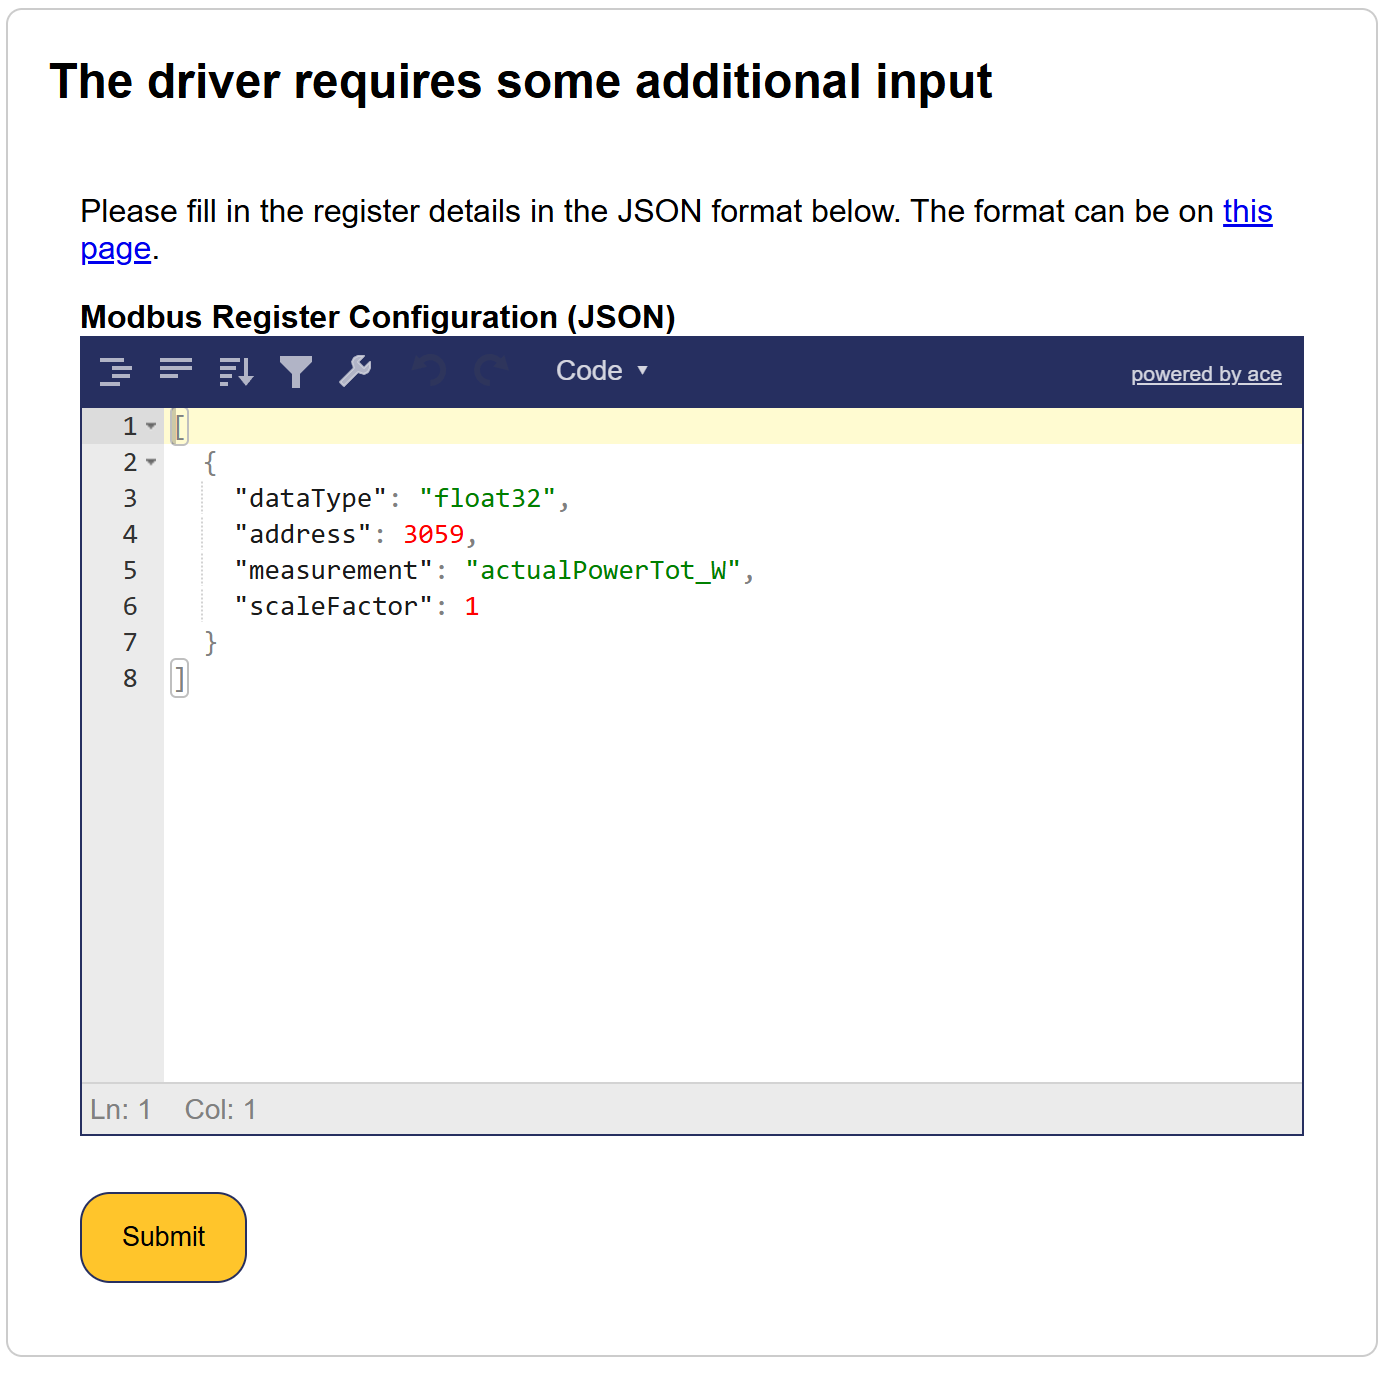
You'll need to provide a JSON configuration that defines which registers to read and how to interpret them. The configuration follows this structure:
[
  {
    "dataType": "float32",
    "address": 3000,
    "wordOrder": "bigEndian",
    "scaleFactor": 1,
    "measurement": "actualPowerTot_W"
  },
  {
    "dataType": "uint32",
    "address": 3002,
    "wordOrder": "bigEndian",
    "scaleFactor": 0.1,
    "measurement": "importedAbsEnergyTot_Wh"
  }
]
Each register configuration requires:
dataType: The type of data stored in the register (e.g., "int16", "uint32", "float32")address: The Modbus register address in decimalmeasurement: The standardized measurement name (e.g., "actualPowerTot_W", "importedAbsEnergyTot_Wh")
Optional fields include:
wordOrder: How multi-register values are ordered ("bigEndian", "littleEndian", "middleEndian", "reverseWord")scaleFactor: Value to multiply the raw register value by (default: 1)offset: Value to add after scaling (default: 0)bytePosition: Position within a byte array (if applicable)enumMapping: For enum types, maps values to stringslength: For arrays or byte fields, number of itemssigned: For numeric types, whether the value is signed
We strongly recommend including at least:
- Total Power (
actualPowerTot_W) - Total Imported Energy (
importedAbsEnergyTot_Wh) - Total Exported Energy (
exportedAbsEnergyTot_Wh) if bi-directional
Enter the code in this place:
I see an error
The input is strictly validated, and will not accept any mistakes:
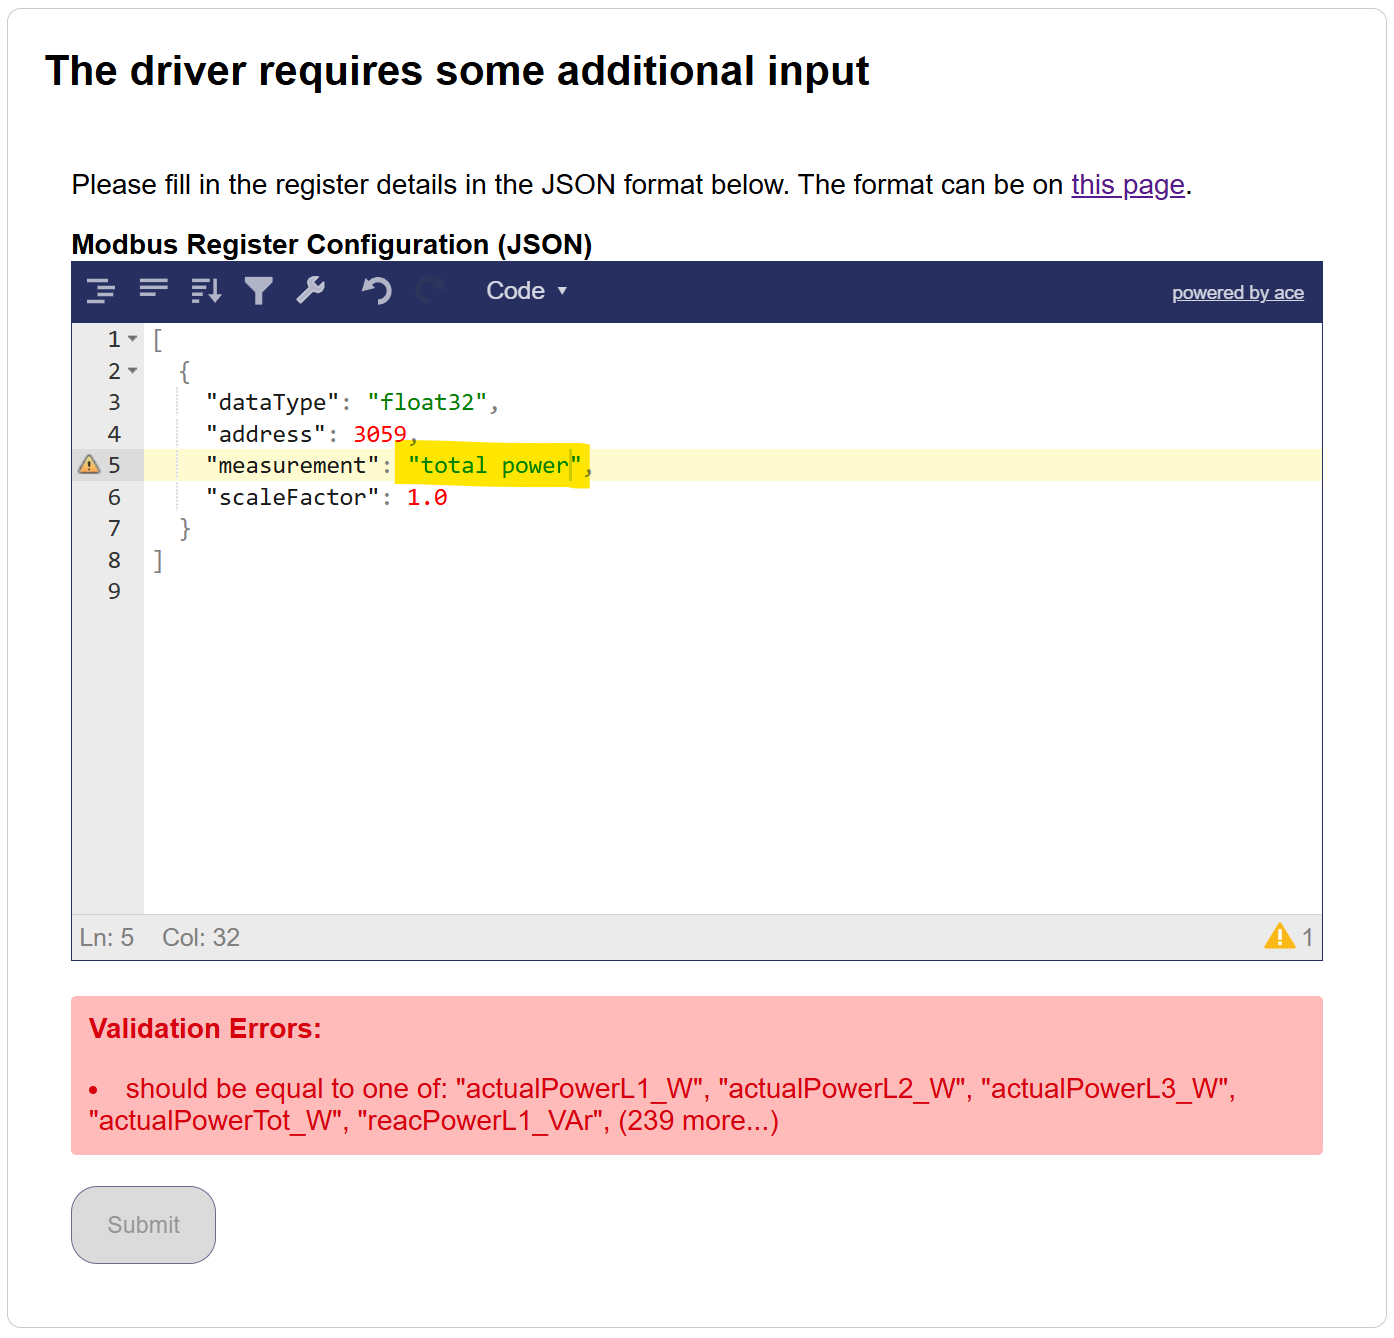
The example above is not accepted because the user choose total power instead of actualPowerTot_W.
The following measurements are accepted:
actualPowerL1_W
actualPowerL2_W
actualPowerL3_W
actualPowerTot_W
reacPowerL1_VAr
reacPowerL2_VAr
reacPowerL3_VAr
reacPowerTot_VAr
importedAbsEnergyL1_Wh
importedAbsEnergyL2_Wh
importedAbsEnergyL3_Wh
importedAbsEnergyTot_Wh
importedEnergyTodayTot_Wh
importedAbsReacEnergyL1_VArh
importedAbsReacEnergyL2_VArh
importedAbsReacEnergyL3_VArh
importedAbsReacEnergyTot_VArh
importedEnergyDeltaTot_Wh
grossImportedEnergyDeltaTot_Wh
importedReacEnergyDeltaL1_VArh
importedReacEnergyDeltaL2_VArh
importedReacEnergyDeltaL3_VArh
importedReacEnergyDeltaTot_VArh
exportedAbsEnergyL1_Wh
exportedAbsEnergyL2_Wh
exportedAbsEnergyL3_Wh
exportedAbsEnergyTot_Wh
exportedEnergyTodayTot_Wh
exportedAbsReacEnergyL1_VArh
exportedAbsReacEnergyL2_VArh
exportedAbsReacEnergyL3_VArh
exportedAbsReacEnergyTot_VArh
exportedEnergyDeltaL1_Wh
exportedEnergyDeltaL2_Wh
exportedEnergyDeltaL3_Wh
exportedEnergyDeltaTot_Wh
grossExportedEnergyDeltaTot_Wh
exportedReacEnergyDeltaL1_VArh
exportedReacEnergyDeltaL2_VArh
exportedReacEnergyDeltaL3_VArh
exportedReacEnergyDeltaTot_VArh
producedAbsEnergyL1_Wh
producedAbsEnergyL2_Wh
producedAbsEnergyL3_Wh
producedAbsEnergyTot_Wh
producedAbsReacEnergyTot_VArh
consumedAbsEnergyL1_Wh
consumedAbsEnergyL2_Wh
consumedAbsEnergyL3_Wh
consumedAbsEnergyTot_Wh
consumedEnergyTodayTot_Wh
consumedAbsReacEnergyTot_VArh
producedEnergyDeltaTot_Wh
consumedEnergyDeltaTot_Wh
producedEnergyTodayTot_Wh
chargedAbsEnergyTot_Wh
chargedEnergyTodayTot_Wh
chargedEnergyDeltaTot_Wh
dischargedAbsEnergyTot_Wh
dischargedEnergyTodayTot_Wh
dischargedEnergyDeltaTot_Wh
childrenProducedEnergyDeltaTot_Wh
childrenConsumedEnergyDeltaTot_Wh
childrenLoadsPower_W
childrenLoadsImpEnergyDeltaTot_Wh
childrenLoadsExpEnergyDeltaTot_Wh
childrenOtherPower_W
childrenOtherImpEnergyDeltaTot_Wh
childrenOtherExpEnergyDeltaTot_Wh
childrenUnmeasPower_W
childrenUnmeasImpEnergyDeltaTot_Wh
childrenUnmeasExpEnergyDeltaTot_Wh
childrenProducedPower_W
childrenConsumedPower_W
childrenStoragePower_W
childrenEVPower_W
childrenHVACPower_W
autoconsumedEnergyDeltaTot_Wh
producedExpEnergyDeltaTot_Wh
childrenStorageChargedEnergyDeltaTot_Wh
childrenStorageDischargedEnergyDeltaTot_Wh
childrenStorageSolarChargeEnergyDeltaTot_Wh
childrenStorageGridChargeEnergyDeltaTot_Wh
childrenStorageSolarDischargeEnergyDeltaTot_Wh
childrenStorageGridDischargeEnergyDeltaTot_Wh
childrenEVChargeEnergyDeltaTot_Wh
childrenHVACEnergyDeltaTot_Wh
currentL1_A
currentL2_A
currentL3_A
currentN_A
currentLAvg_A
voltageL1N_V
voltageL2N_V
voltageL3N_V
voltageLNAvg_V
voltageL1L2_V
voltageL2L3_V
voltageL3L1_V
voltageLLAvg_V
frequency_Hz
powerFactorTot
powerFactorL1
powerFactorL2
powerFactorL3
voltageDCBus_V
voltageInput1_V
currentInput1_A
powerInput1_W
voltageInput2_V
currentInput2_A
powerInput2_W
voltageInput3_V
currentInput3_A
powerInput3_W
voltageInput4_V
currentInput4_A
powerInput4_W
voltageInput5_V
currentInput5_A
powerInput5_W
voltageInput6_V
currentInput6_A
powerInput6_W
voltageInput7_V
currentInput7_A
powerInput7_W
voltageInput8_V
currentInput8_A
powerInput8_W
voltageInput9_V
currentInput9_A
powerInput9_W
voltageInput10_V
currentInput10_A
powerInput10_W
voltageDC_V
currentDC_A
voltageInputA_V
currentInputA_A
powerInputA_W
voltageInputA1_V
currentInputA1_A
powerInputA1_W
voltageInputA2_V
currentInputA2_A
powerInputA2_W
voltageInputA3_V
currentInputA3_A
powerInputA3_W
voltageInputA4_V
currentInputA4_A
powerInputA4_W
voltageInputA5_V
currentInputA5_A
powerInputA5_W
voltageInputA6_V
currentInputA6_A
powerInputA6_W
voltageInputB_V
currentInputB_A
powerInputB_W
voltageInputB1_V
currentInputB1_A
powerInputB1_W
voltageInputB2_V
currentInputB2_A
powerInputB2_W
voltageInputB3_V
currentInputB3_A
powerInputB3_W
voltageInputB4_V
currentInputB4_A
powerInputB4_W
voltageInputB5_V
currentInputB5_A
powerInputB5_W
voltageInputB6_V
currentInputB6_A
powerInputB6_W
currentInputTot_A
voltageInputAvg_V
powerInputTot_W
cabinetTemp_degC
ambientTemp_degC
heatSinkTemp_degC
isolationResistance_kOhm
runTimeTot_s
status
statusMsg
workingMode
operationMode
heatingAbsEnergy_Wh
heatingAbsVolume_m3
flowRate_m3ph
thermalPower_W
departureLineTemp_degC
returnLineTemp_degC
chargedAbsSessionEnergyTot_Wh
sessionDuration_s
chargingSessionId
evNumOfPhases
evUsedPhases
evTargetACChargeCurrent_A
evRequiringCharge
remainingEnergy_Wh
batteryVoltage_V
batteryCurrent_A
batteryPower_W
batteryTemp_degC
batteryOperationMode
PVOperationMode
gridOperationMode
current_A
consumedEnergy_Ah
stateOfCharge_frac
powerSetpoint_W
minStateOfCharge_frac
stateOfHealth_frac
storedEnergy_Wh
absVolume_m3
volumeDelta_m3
flow_m3ps
absPulseCount
pulseCountDelta
pulseRate_ph
flow1_m3ps
flow2_m3ps
flow3_m3ps
flow4_m3ps
flow5_m3ps
flow6_m3ps
flow7_m3ps
flow8_m3ps
flow9_m3ps
flow1_Lps
flow2_Lps
flow3_Lps
flow4_Lps
flow5_Lps
flow6_Lps
flow7_Lps
flow8_Lps
flow9_Lps
Step 5
After filling in the required information, save the configuration. The SmartgridOne Controller will now attempt to communicate with the energy meter using the provided settings.
Suggerimento
For better organization, you can create your JSON configuration in a text editor first, then paste it into the configuration field. This makes it easier to edit and validate the structure before applying it.