Obsługiwane urządzenia
| Device Type | Modbus TCP (Ethernet) | RS485 |
|---|---|---|
| Inepro PRO380 | ❌ | ✅ |
Okablowanie
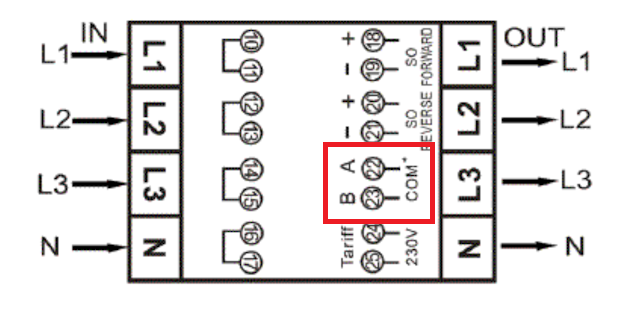
RS485
RS485 Wiring
- For correct RS485 wiring: Follow the guidelines for RS485 wiring.
- If the wiring shown in the table below is incorrect, please let us know.
- There is no general consensus in the industry about the usage of A and B for the RS485 polarity, so it may be counterintuitive and opposite of what you might expect for some devices.
| Device | SmartgridOne Controller model OM1 | SmartgridOne Controller model IG8 | RS485-USB converter | RS485-Ethernet converter |
|---|---|---|---|---|
| A (pin 22) | RS485 A | RS485_POS | RS485 A | TX+ |
| B (pin 23) | RS485 B | RS485_NEG | RS485 B | TX- |
| N/D | RS GND | GND | Not available | G |
Konfiguracja
NOTE: RS485 Device Addresses
- You MUST give each device on the RS485 bus a unique address. Check the manual of the device on how to do this.
- Use lower addresses first (1, 2, ...) because the SmartgridOne Controller will find them faster!
- For each device, it is generally recommended to stick with the factory default baud rate, parity, and stop bits. The SmartgridOne Controller will scan on those first.
Odwołaj się do podręcznika miernika, aby uzyskać bardziej szczegółowe informacje na temat zmiany adresu Modbus. Domyślnie miernik jest ustawiony na adres 1. Można to zmienić za pomocą wyświetlacza miernika.
- Użyj przycisków, aby przejść do trybu programowania 2.
- Naciśnij i przytrzymaj prawy przycisk przez 3 sekundy, aby otworzyć menu.
- Przewiń do strony LCD Modbus/M-bus ID (addr xxx).
- Naciśnij i przytrzymaj prawy przycisk przez 5 sekund, aby wejść w tryb programowania.
- Wartość zaczyna migać: wybierz 3 cyfry (Modbus: 001-247). Potwierdź każdą cyfrę, przytrzymując oba przyciski przez 3 sekundy.
- LCD pokazuje OK, gdy ustawienie jest potwierdzone.
